Noxious - PCAP Analysis

In this lab, we analyze a PCAP to uncover an LLMNR/NBT-NS poisoning attack. Step by step, we identify the rogue machine, trace the victim’s mistake, and observe how credentials were captured and could be used for unauthorized access. This scenario provides a practical view of how such attacks unfold in real environments.
Scenario
The IDS device alerted us to a possible rogue device in the internal Active Directory network. The Intrusion Detection System also indicated signs of LLMNR traffic, which is unusual. It is suspected that an LLMNR poisoning attack occurred. The LLMNR traffic was directed towards Forela-WKstn002, which has the IP address 172.17.79.136. A limited packet capture from the surrounding time is provided to you, our Network Forensics expert. Since this occurred in the Active Directory VLAN, it is suggested that we perform network threat hunting with the Active Directory attack vector in mind, specifically focusing on LLMNR poisoning.
What is LLMNR Poisoning
LLMNR (Link-Local Multicast Name Resolution) is used when DNS fails to resolve a hostname. The problem is that it does not have any authentication mechanism, which means any machine on the same network can respond to these queries.
In a typical LLMNR/NBT-NS poisoning scenario, a victim system tries to resolve a hostname—often because of a simple typo. Since DNS cannot resolve it, the system falls back to LLMNR or NetBIOS. At this point, an attacker on the network can respond and claim to be that host. The victim trusts this response and attempts to authenticate, sending NTLM credentials to the attacker. If the password is weak, the attacker can crack the hash and potentially gain access.
Identify Hosts
Before jumping into the attack, we first identify the normal environment. This makes spotting anything suspicious much easier.
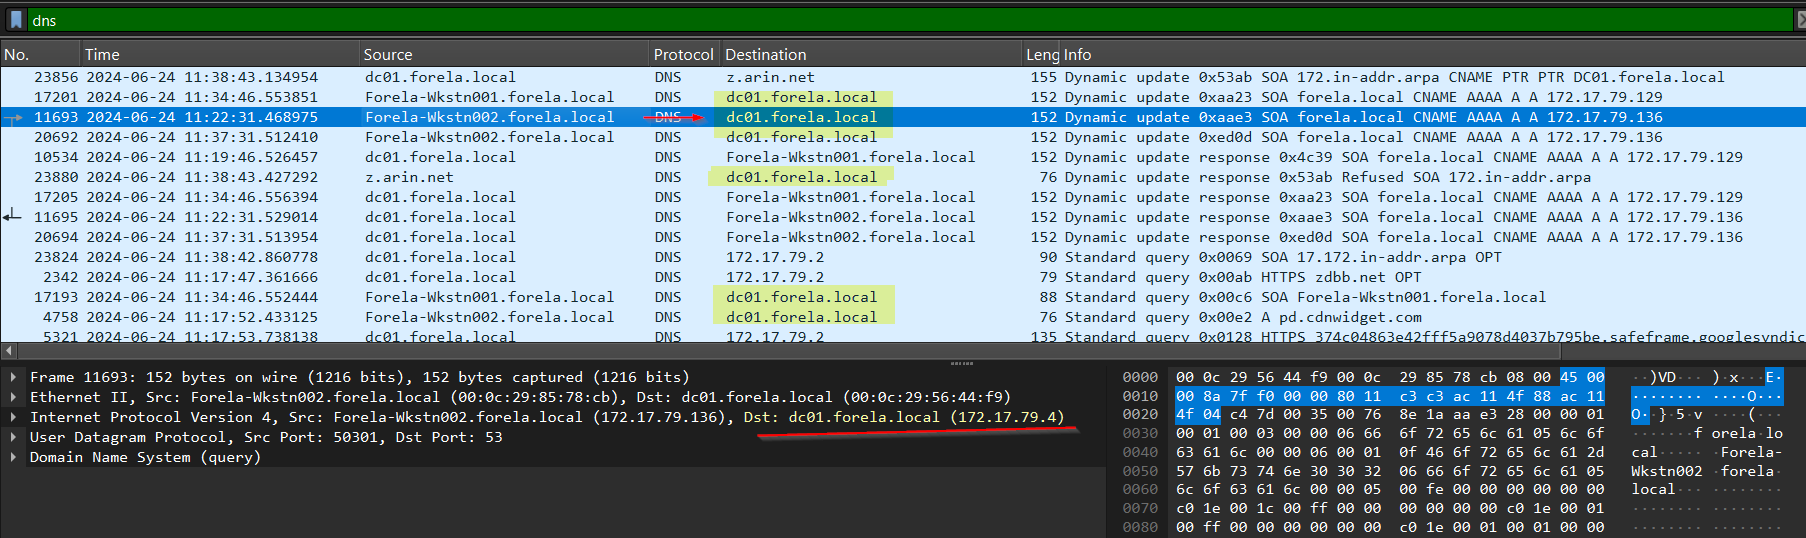
To find the Domain Controller, we can look at DNS traffic using the dns filter. Most of the time, the Domain Controller also handles DNS resolution.
In the capture, all DNS queries are being sent to dc01.forela.local (172.17.79.4), confirming that this is our Domain Controller.
Next, we move to NetBIOS traffic using the nbns filter. 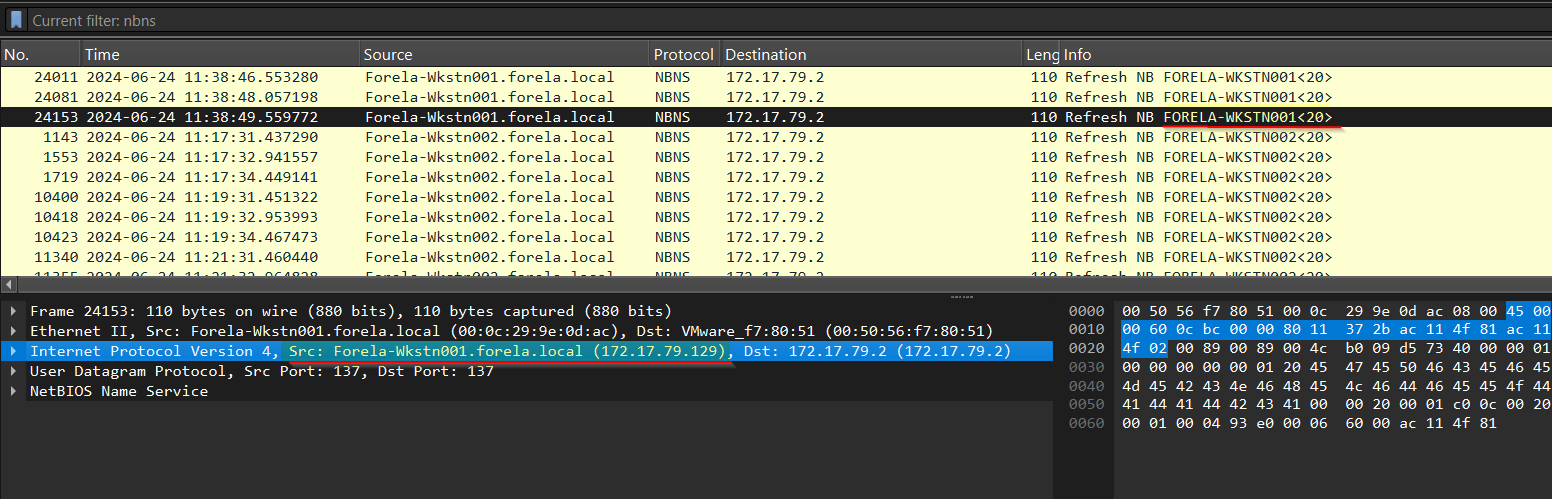 Here, we can observe NBNS refresh responses, which help map hostnames to IP addresses. From this, we identify the legitimate machines in the network.
1
2
 172.17.79.129 corresponds to FORELA-WKSTN001
 172.17.79.136 corresponds to FORELA-WKSTN002
At this point, we have a clear picture of the normal hosts and the Domain Controller, which makes it easier to identify anything out of place.
Identifying the Attacker and Spoofing Activity
Now comes the interesting part. Looking again at the NBNS traffic, we notice that the victim machine 172.17.79.136 is repeatedly querying for the hostname DCC01. This immediately stands out as a typo 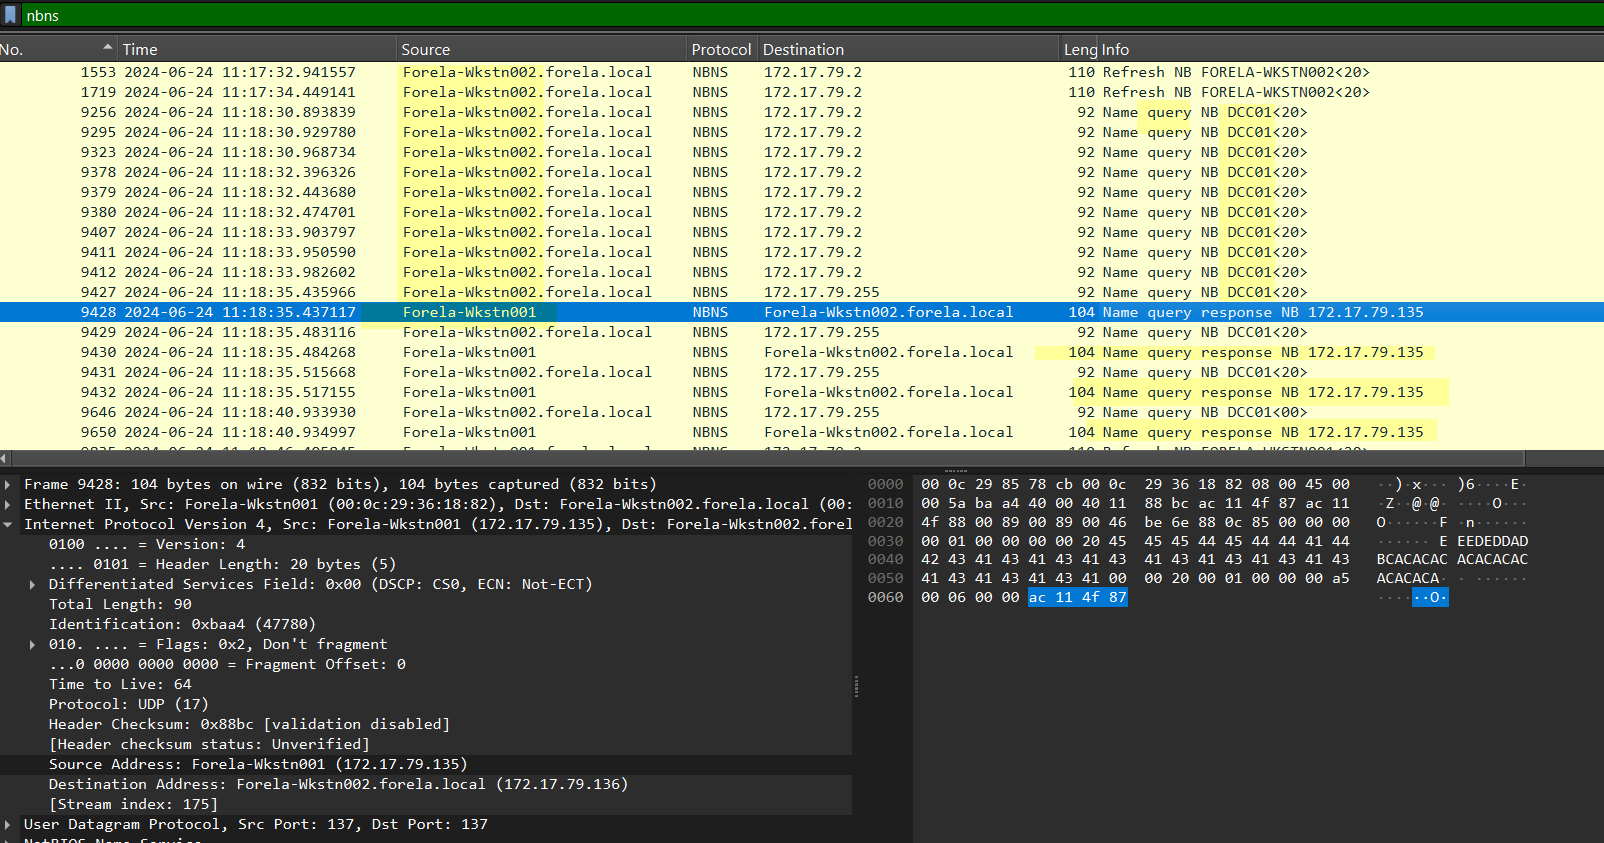 Because this incorrect hostname cannot be resolved through DNS, the system falls back to LLMNR and NBNS. This is exactly where the attacker takes advantage.
We observe that 172.17.79.135 responds to these queries, claiming that DCC01 is 172.17.79.135. This is clearly suspicious, because this IP does not belong to the Domain Controller, yet it is pretending to be a DC-related host.
This behavior confirms that 172.17.79.135 is the rogue machine performing poisoning.
To further validate this, we check LLMNR traffic by filtering for llmnr (or UDP port 5355). Once again, we see the same pattern: the victim queries for DCC01, and the attacker at 172.17.79.135 responds. 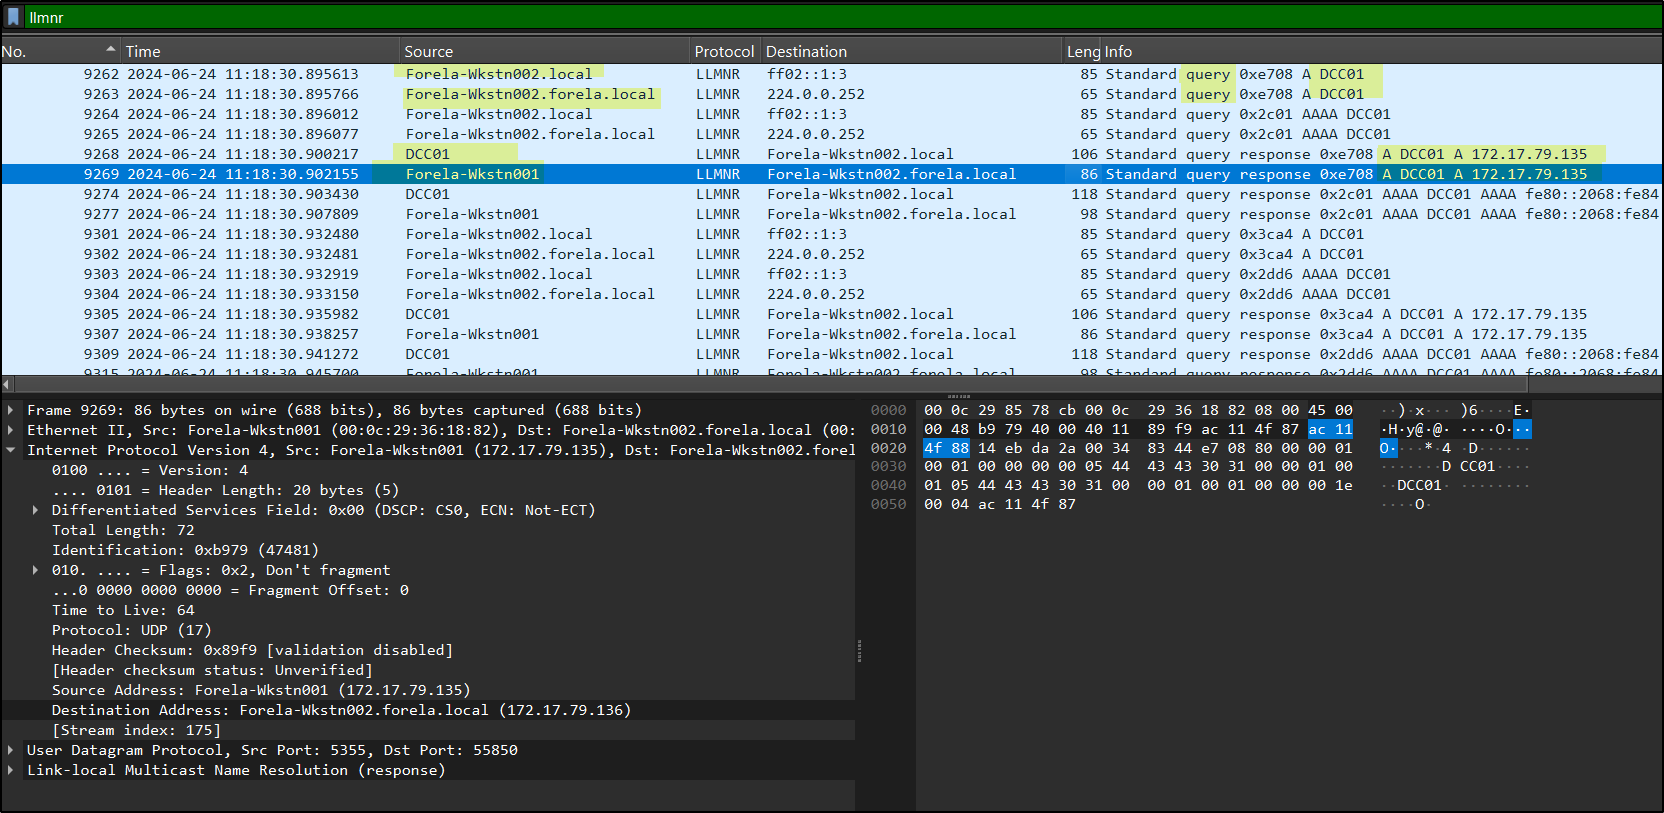 This confirms that the attacker is actively spoofing across both NBNS and LLMNR.
Interestingly, this attacker is not tied to a single identity. It responds as different hostnames such as DC001 or Forela-Wkstn001, even though those mappings are incorrect. The real WKSTN001 is actually 172.17.79.129, and DC001 does not even exist. This indicates that attacker simply claims any requested name.
To find out what this machine actually is, we look at DHCP traffic using a filter like dhcp && ip.addr == 172.17.79.135. 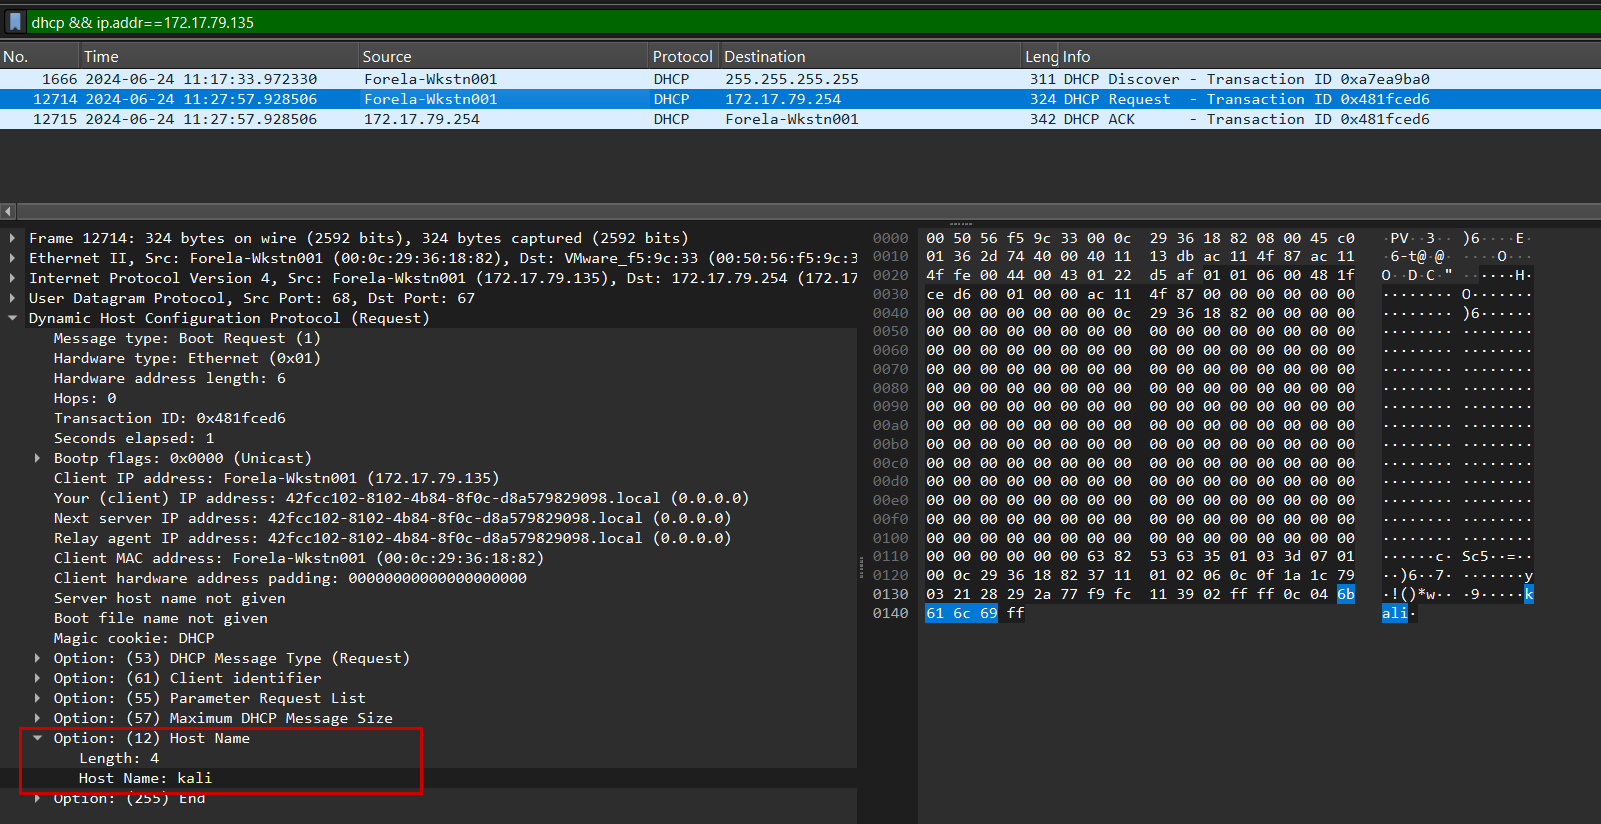 In the DHCP request, under Option 12 (hostname), we can see that the system identifies itself as kali, confirming it is the attacker machine.
NTLM Authentication Capture
By filtering for ntlmssp (or SMB traffic between .136 and .135), we can observe NTLM authentication exchanges. 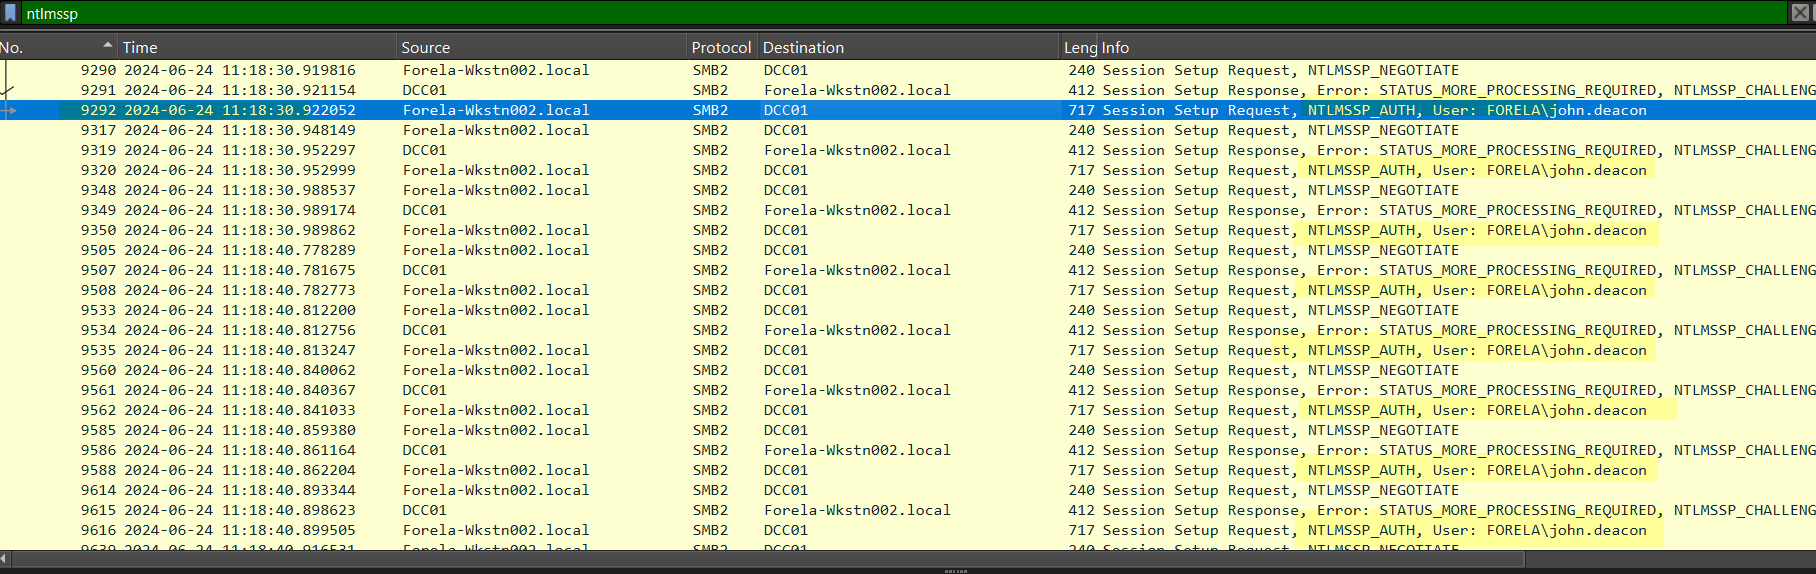 The victim machine FORELA-WKSTN002 (172.17.79.136) repeatedly sends authentication requests to the attacker.
In these packets, we can clearly see:
1
User: FORELA\john.deacon
This confirms that the attacker successfully captured NTLM authentication data. If the password is weak, this user john.deacon hash can be cracked offline.
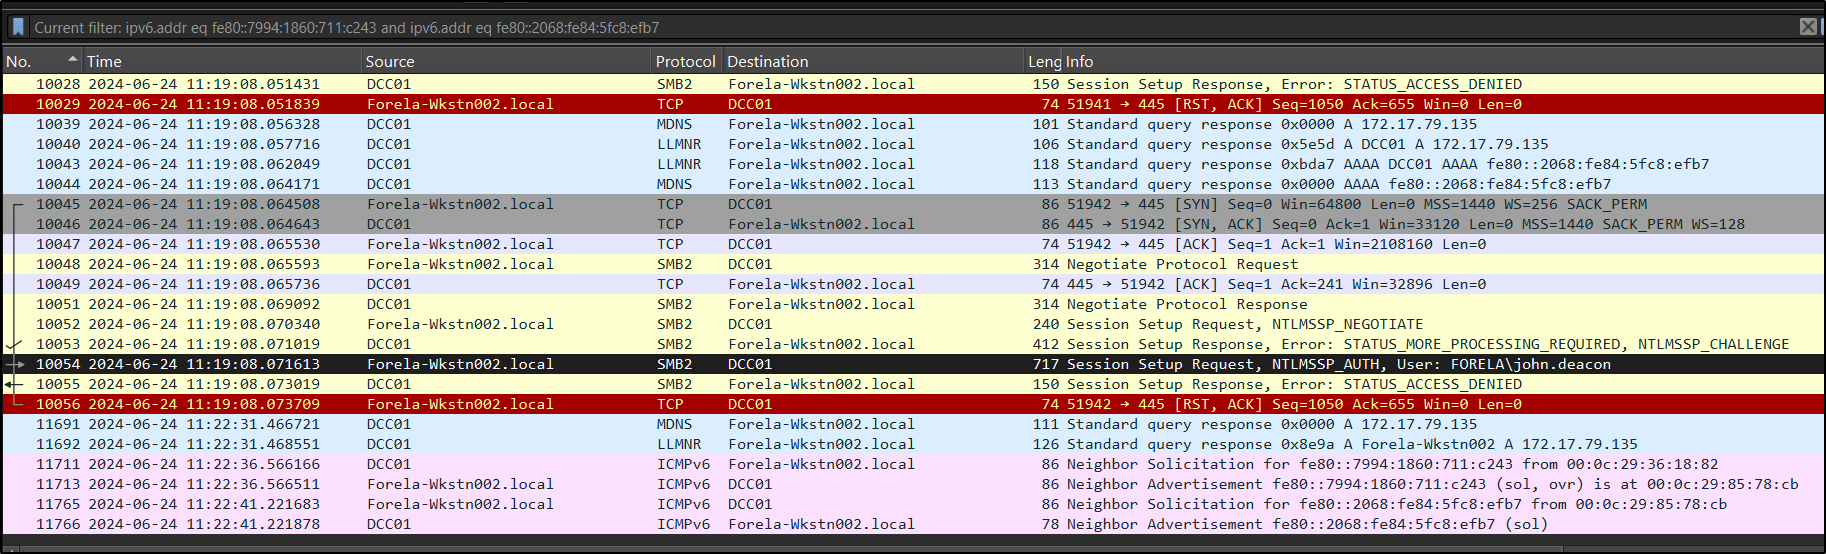
Did the Attacker Gain Access? Even though the attacker successfully captured NTLM hashes, there is no evidence of a successful login or further interaction with the victim system. We do not see any SMB session establishment, command execution, or lateral movement from 172.17.79.135 after the relays in the PCAP given.
What Was the Victim Actually Trying to Access?
To understand the intent, we look at SMB traffic between the victim(172.17.79.136) and the Domain Controller (172.17.79.4). 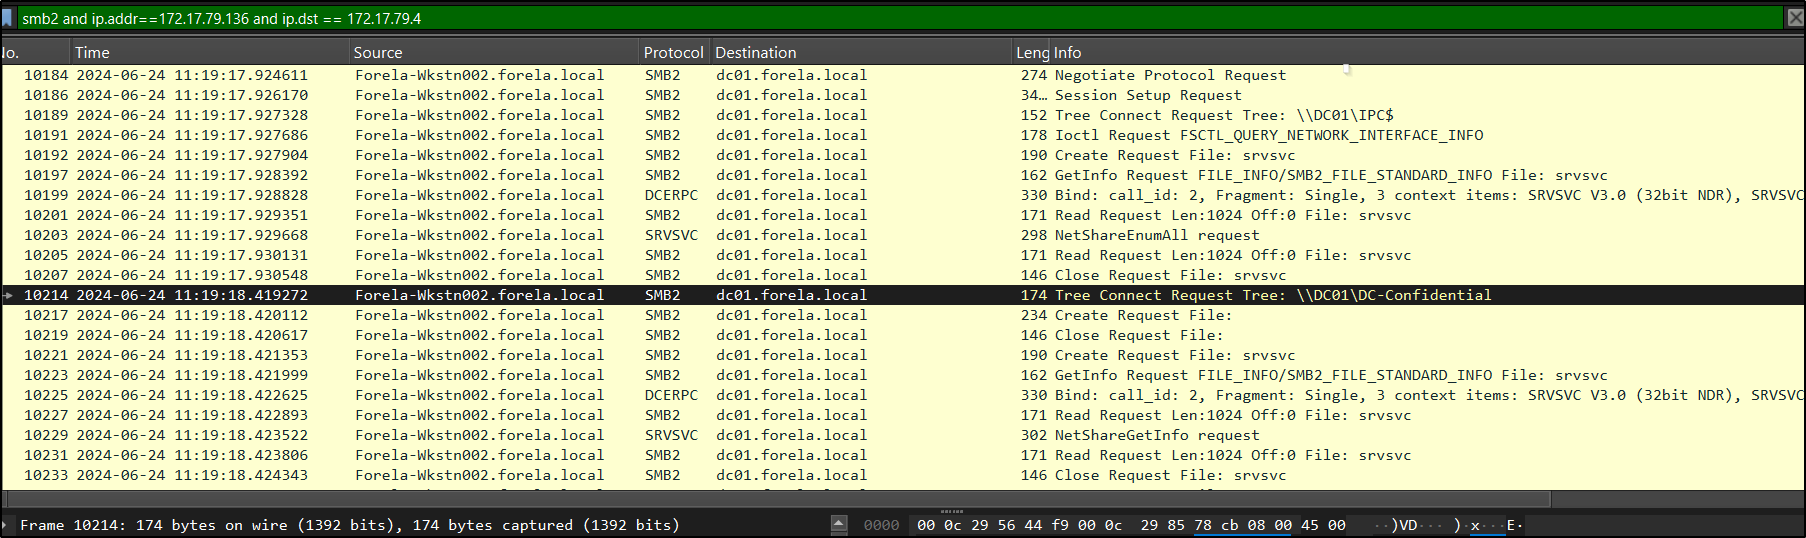 Here, we observe that when the correct hostname is used (without typos), the victim successfully connects to the intended file share:
1
\\DC01\DC-Confidential
This confirms that the entire attack was triggered by a simple typo (DCC01 instead of DC01), which caused the system to fall back to LLMNR/NBNS and allowed the attacker to intervene.
Cracking the Captured NTLMv2 Hash
actually , ididn’t know that we can actually, from a pcap file, grab hashes and crack it offline lets learn together
Step 1: Filter NTLM Traffic
Start by filtering NTLM packets: ntlmssp
Focus on one full authentication sequence:
1
2
3
NTLMSSP_NEGOTIATE
NTLMSSP_CHALLENGE
NTLMSSP_AUTH
We will extract required values from these packets. I chose First response sent to attacker, because hashes changes everytime
Step 2: Extract Required Values
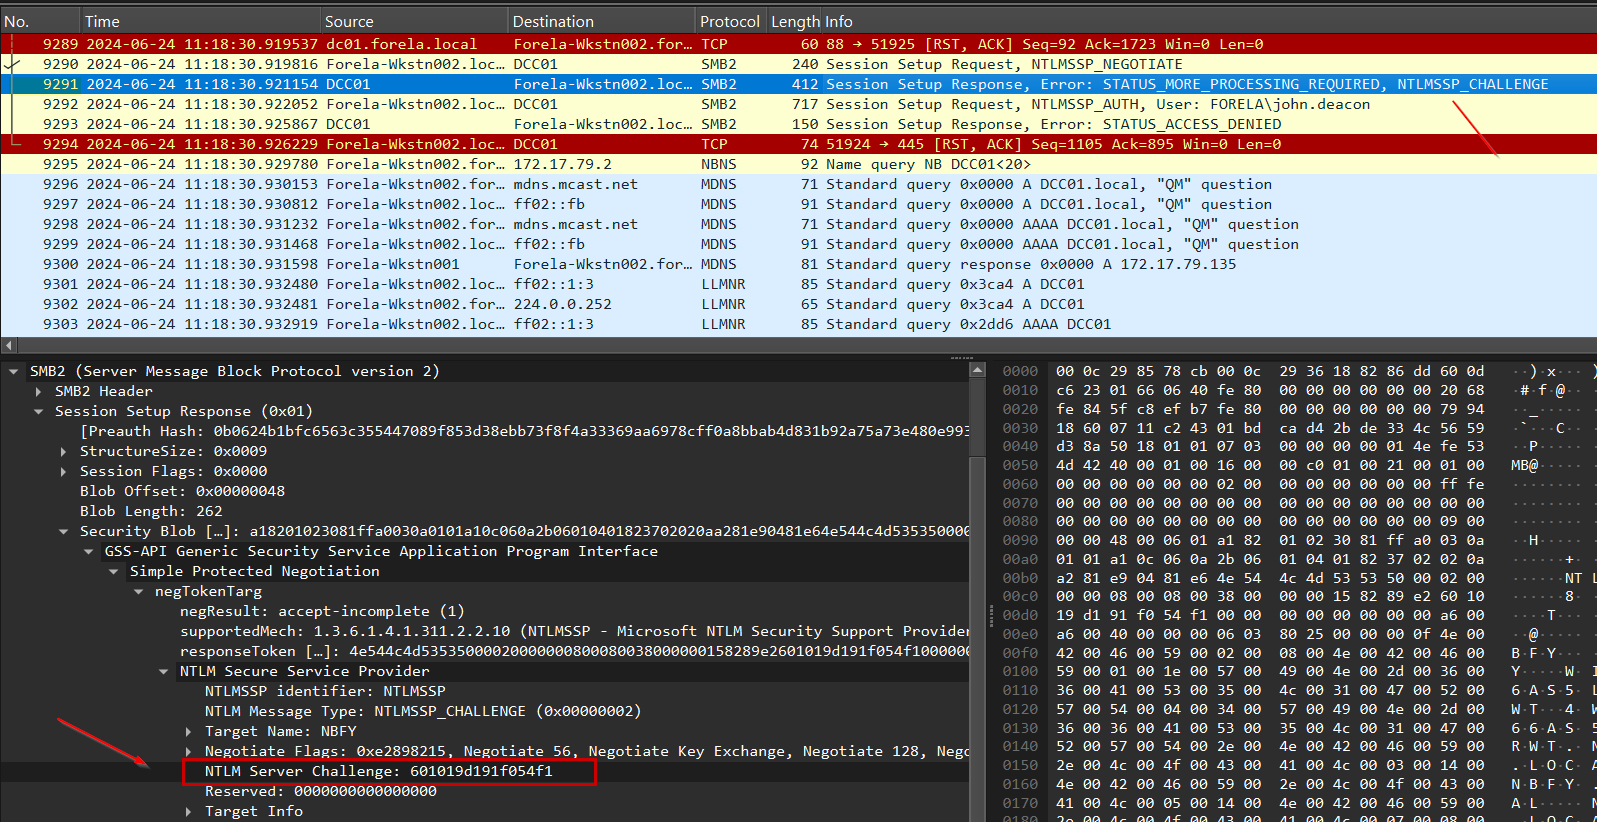
Go to the NTLMSSP_CHALLENGE packet. - Server Challenge
Expand: **SMB2 → Session Setup Response → Security Blob → GSS-API → negTokenTarg → NTLMSSP → NTLM Server Challenge **
Copy the value: ServerChallenge = value
Now go to the NTLMSSP_AUTH packet.
Expand: **SMB2 → Session Setup → Security Blob → GSS-API → negTokenTarg → NTLMSSP → NTLM Response → NTLMv2 Response → NTProofStr **
Copy: NTProofStr = value
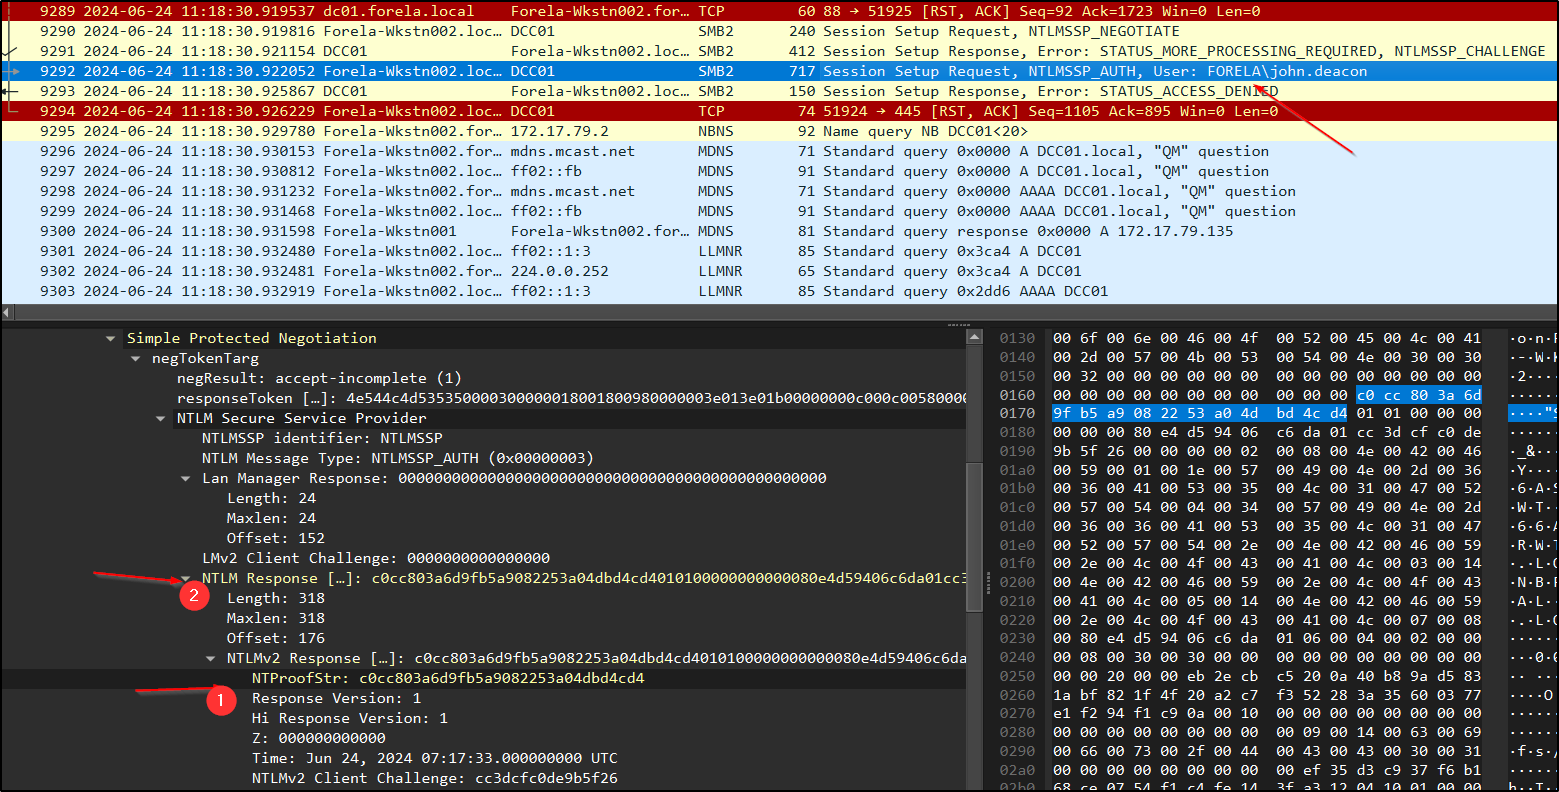
In the same NTLMSSP_AUTH packet: Copy the full NTLMv2 Response Remove the first 16 bytes (32 hex characters) because First 16 bytes = NTProofStr (already used)
Remaining part: NTLMv2Response = trimmed value
Username and Domain are availble in the same NTLMSSP_AUTH packet:
1
2
Username → john.deacon
Domain → FORELA
Step 3: Format the Hash and Crack Using JohntheRipper
Now construct the hash in this format:
1
Username::Domain:ServerChallenge:NTProofStr:NTLMv2Response
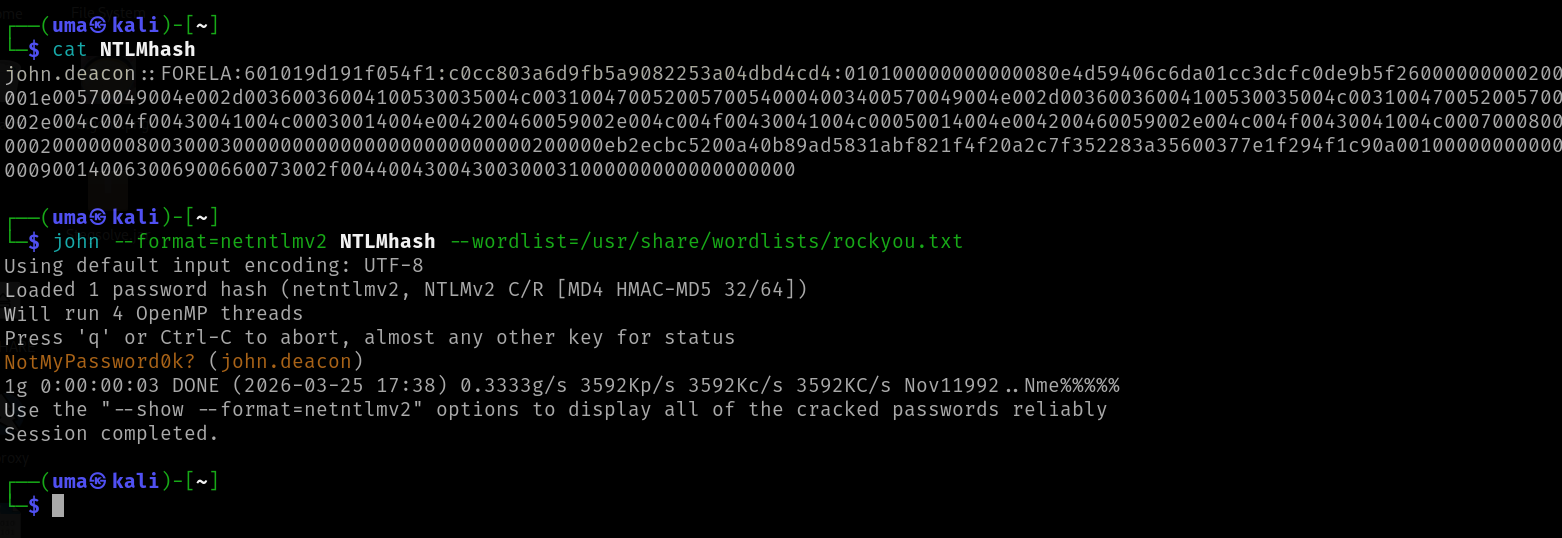
Once the hash is properly formatted, save it into a file (for example, hash.txt). We can then attempt to crack it using tools like Hashcat or John the Ripper.
Since this is an NTLMv2 hash, we need to select the correct mode/format. We also use a common wordlist like rockyou.txt, which contains a large collection of real-world passwords for comparison.
Using Hashcat, the command would look like:
1
hashcat -a 0 -m 5600 hash.txt rockyou.txt
Alternatively, with John the Ripper:
1
john --format=netntlmv2 --wordlist=rockyou.txt hash.txt
Both tools attempt to match the captured hash against passwords in the wordlist. If the password is weak, it can be recovered quickly, confirming that the captured credentials are usable by an attacker. In our case, the hash was successfully cracked, indicating that the password was weak and easily guessable.
This highlights how minor user errors, combined with insecure protocols like LLMNR and NBNS, can expose credentials and create serious security risks.